kod38
Full Member
  
Posts: 384
|
Post by kod38 on Jan 13, 2007 16:24:33 GMT -5
Hey guys, I just started hacking at this ghia body today. I think I will try to retain some of the rear bodywork? Maybe not. I made a couple centerline wheels and may make and use those instead of my trade mark BFG's.LOL! Here is a really rough mock up. What do you think of the body look? Keep in mind it will have alot of cage and bumper work. Thanks. Doug     |
|
|
|
Post by wagonguy on Jan 13, 2007 22:11:24 GMT -5
i thiknk this is going to be killer... i like it!!!
|
|
|
|
Post by The Mad Modeller on Jan 14, 2007 0:38:42 GMT -5
Looks good but how will it make it around on only 2 wheels? LOL
|
|
|
|
Post by ronr on Jan 14, 2007 9:39:20 GMT -5
Looking good KOD! I`m with you keep as much of the rear body work as ya can.
|
|
vwdave
Full Member
   It's Ferb-tastic!
Posts: 292
|
Post by vwdave on Jan 14, 2007 21:36:18 GMT -5
I'm on the 'keep as much Ghia bodywork as you can' bandwagon, Doug.....although I envision it wrapped in tubular bumpers and side nerf bars. I think it would be cool to have the mounts for some long-travel front shocks poking through the fenders  |
|
kod38
Full Member
  
Posts: 384
|
Post by kod38 on Jan 23, 2007 15:05:38 GMT -5
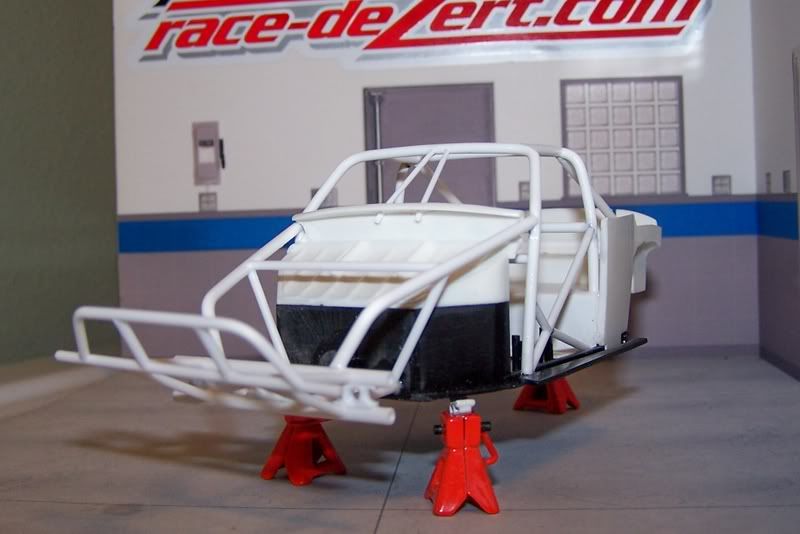
Well, I started the cage and have a fuel cell that will use a dry break just behind the passenger door in the body. The cage is about 60% done and I will start building forward then do the rear of the car. Doug    |
|
|
|
Post by The Mad Modeller on Jan 23, 2007 20:41:31 GMT -5
Great work on the cage. This is going to be one sick Ghia.
|
|
opa1
Junior Member
 
Posts: 133
|
Post by opa1 on Jan 23, 2007 21:21:47 GMT -5
Great work on the cage. This is going to be one sick Ghia. GONNA BE A MEAN LOOKING GHIA! |
|
kod38
Full Member
  
Posts: 384
|
Post by kod38 on Jan 28, 2007 19:06:53 GMT -5
Thanks for the nice comments guys. Today, I built the front beam and tied it in to the main cage. I still need add alot to it. I also made a front bumper and mounted it. In the rear,I re-did the rear most hoop and cut out the fender well area for shocks to go through. The next step is to make front arms and shock mounts,then it's to the back of the chassis. Doug R    |
|
|
|
Post by wolle on Jan 29, 2007 15:45:18 GMT -5
Very cool Project!! Very nice wheels ;D
greets
wolle
|
|
|
|
Post by bigjeepzz on Jan 30, 2007 19:11:13 GMT -5
Doug you are doing an excellent job on this. Nice job on taking something I would never look at and completely opening up a whole new prospective. Just like the Kubel you are going to freak people out. Nice work and keep posting pics.
Jake
|
|
kod38
Full Member
  
Posts: 384
|
Post by kod38 on Feb 21, 2007 0:45:59 GMT -5
Well, I jumped way ahead and painted the body. I don't think I should have ,but it's done.LOL! I had to do something to help motivate me. It's black with a bluish purple splash pattern. When the build is done I will take non flash pictures because the blue is not so bright until the flash hits it. Hope you like it? Doug    |
|
|
|
Post by ninja90177 on Feb 21, 2007 3:07:02 GMT -5
That thing's awesome. Can't wait to see that paint in all it's glory.
|
|
|
|
Post by wagonguy on Feb 22, 2007 11:21:53 GMT -5
WOW!!!!
that paint job is perfect!
i love it doug!
|
|
|
|
Post by The Mad Modeller on Feb 22, 2007 22:00:56 GMT -5
Looks great Doug. CAn't wait for more updates.
|
|
kod38
Full Member
  
Posts: 384
|
Post by kod38 on Mar 4, 2007 23:47:47 GMT -5
|
|
|
|
Post by wagonguy on Mar 5, 2007 11:47:48 GMT -5
wow.... thats all i can say!
|
|
|
|
Post by modelmasterbruce on Mar 6, 2007 21:26:33 GMT -5
I cant wait to see this one done.. NICE WORK.....
Bruce
|
|
kod38
Full Member
  
Posts: 384
|
Post by kod38 on Mar 31, 2007 13:51:01 GMT -5
The motor is done as it gets. I hate doing the motors,I am not patient at all.LOL! So here goes. Not much else done,I hopt to have it done by the 21rst. Doug  |
|
|
|
Post by ninja90177 on Apr 1, 2007 2:34:02 GMT -5
Pretty sweet looking engine there. Those Header pipes look a little small for a dual-carbed engine though. Overall, it looks awesome.
|
|
kod38
Full Member
  
Posts: 384
|
Post by kod38 on Apr 1, 2007 14:09:57 GMT -5
Pretty sweet looking engine there. Those Header pipes look a little small for a dual-carbed engine though. Overall, it looks awesome. I just go with what I have for materials.LOL. They are only just over 1" scale. Once the engine cage is around it,no one will notice except for true Vee Wee guys. Thanks. DougR |
|
kod38
Full Member
  
Posts: 384
|
Post by kod38 on Apr 15, 2007 18:53:40 GMT -5
Chassis is done. Fuel cell,battery box,seats,steering wheel,etc.. in. I just have to make and mount 4 shocks,rear axles and brakes. Then it is assemble and finish time.I hope I can get it done by saturday. Doug R  |
|
|
|
Post by The Mad Modeller on Apr 15, 2007 19:33:11 GMT -5
Looking good. Going to be one bad Ghia.
|
|
vwdave
Full Member
   It's Ferb-tastic!
Posts: 292
|
Post by vwdave on Apr 15, 2007 22:42:03 GMT -5
Doug - Even as one of the aforementioned 'true Vee Wee guys,' I think the header looks pretty fine; you are right that it will be less obvious once surrounded by the rear cage, and the whole build will overshadow any minor things like that. If you have a Michaels' craft store in your area, I can recommend some really good header material for your future builds. Email me if you're into it.  |
|
|
|
Post by The Mad Modeller on Apr 20, 2007 22:31:07 GMT -5
Share the secret with all of us Dave.
|
|
vwdave
Full Member
   It's Ferb-tastic!
Posts: 292
|
Post by vwdave on Apr 21, 2007 0:09:51 GMT -5
Share the secret with all of us Dave. Bobby - You are right, everyone needs to see this. If you have a local Michaels craft store(A.C. Moore might also carry it, but I haven't looked there), here is a product you must try:  WireForm armature wire is intended for use in clay model forms. It's available in 2 or 3 different diameters, it is easily bent by hand.....and it has a solid core so every bend is 'kink-free.' It also takes quite well to a minor polishing or fine sanding for texture. Not a bad price for 4 feet:  (straight sections are also available, but the price is considerably higher) I used the smaller stuff on my V-Bucket's headers, and was able to get them very symmetrical - I only had to re-do one single pipe in the process.  [/img] |
|
|
|
Post by The Mad Modeller on Apr 21, 2007 15:43:14 GMT -5
Thanks for the info Dave. Just one question. How do you attach them to the engine?
|
|
vwdave
Full Member
   It's Ferb-tastic!
Posts: 292
|
Post by vwdave on Apr 21, 2007 20:40:40 GMT -5
In the case of the V-Bucket I drilled holes the same size as the WireForm material in the heads, where the exhaust ports would be; I sunk the material into the holes about 1/16", and used CA to secure it....I was a little short on time, as I made the pipes late on the Thursday night/very early Friday morning before the NNL East last year. There was a little surface 'hazing' from the glue, but the tight confines of the engine-to-firewall gap help hide it well. The next time I make pipes with that stuff I'll use PE flanges and 5-minute epoxy - no chance of 'hazing' like CA  |
|
kod38
Full Member
  
Posts: 384
|
Post by kod38 on Apr 22, 2007 12:36:38 GMT -5
|
|
|
|
Post by The Mad Modeller on Apr 22, 2007 13:53:51 GMT -5
Looks great Doug. Another top notch off road build from your bench. Now get started on the next build. LOL
|
|


