|
|
Post by z24dude on Mar 1, 2010 11:44:00 GMT -5
I would not have the patience to go back and do all that work in one week!!! I agree with NachoZ.
|
|
|
|
Post by Gary Kulchock on Mar 7, 2010 13:49:42 GMT -5
;D Doing my happy dance! ;D I've had a good weekend so far on the Predator and hope to finish constructing the front suspension tonight. Thought I'd give you all a look. All brass with photo-etched caliper mounting bracket. Sweet!  Here, check out the size of these parts.  |
|
|
|
Post by Nacho Z on Mar 7, 2010 13:57:04 GMT -5
You Sir are ridiculous......and I mean that in a good way ;D  |
|
|
|
Post by The Mad Modeller on Mar 7, 2010 16:39:31 GMT -5
You always amaze me Gary. You are a true master and Im honored to call you my friend.
|
|
|
|
Post by bigmike312 on Mar 11, 2010 1:40:57 GMT -5
This build is truly amazing. I would never have the patience to attempt something like this.
Big Mike
|
|
|
|
Post by Gary Kulchock on Mar 13, 2010 1:18:54 GMT -5
;D The front suspension is nearing completion. Here take a look. I still need to add in the tie rods.  Here is the left side showing everything that's squeezed inside the wheel.  I wanted the front tires pushed to the very edge of the front fenders. The large void behind the tire required something there, so I came up with these "gills" that will be covered with carbon fiber. I'm still looking for some tires with less sidewall to drop the front end even more.  Heres a shot from the underbelly. The large hole is for the finned oil pan.  |
|
|
|
Post by Nacho Z on Mar 13, 2010 10:36:09 GMT -5
I always run out of superlatives   . Looks like I will be driving all the way home from NNL East again this year.....  |
|
|
|
Post by Gary Kulchock on Mar 13, 2010 11:07:15 GMT -5
I always run out of superlatives   . Looks like I will be driving all the way home from NNL East again this year.....  Oh I can only hope you will John. .... but, there's always that bigger fish thing. |
|
|
|
Post by Gary Kulchock on Mar 13, 2010 18:58:46 GMT -5
Front suspension and tie rods all finished.  I'm moving on to sizing the 4-link bars and measuring the rear end so I can get the massive rear wheels machined tomorrow. I should also be laying down some primer on the body so I can prep for the silver base-coat come Wednesday. Later ...... Gary |
|
|
|
Post by Gary Kulchock on Mar 14, 2010 12:50:08 GMT -5
;D Ready to start laying down some primer. ;D Front view:  Check out the modified area where the headers exit. This was done when I needed to slide the motor back.  Rear view: Forgot to include the working gas cap in the photo.  Not much on trunk space so I won't be taking it on any weekend adventures.  Mirrors are modified Honda S2000 |
|
|
|
Post by Gary Kulchock on Mar 14, 2010 13:09:00 GMT -5
This should make it pop. This blue has a hint of a teal color. I'm getting excited!  |
|
|
|
Post by Nacho Z on Mar 14, 2010 16:14:37 GMT -5
I just left Gary's house and got to see this cazy thing in person  . I'm going to wear out the    face!. Oh yeah, BTW, Gary is a great guy too. He helped me out with some parts for the Lotus F1 I am currently working on. Thanks Gary!! |
|
|
|
Post by Gary Kulchock on Mar 17, 2010 21:50:22 GMT -5
;D Finally got to a point where I could lay down some primer sealer through the airbrush to about 50 percent of the parts. I found a couple flaws in the body and on one of the headers that will need additional work. The good news is I'm still pretty much on schedule. ;D  |
|
|
|
Post by Gary Kulchock on Mar 19, 2010 22:33:04 GMT -5
Base coat is on. Sunday I'll be laying on the pearl blue nail polish.  Also got the heat shields covered and mounted the radiator overflow bottle supports. I just slid the bottle is to see how it fit.  |
|
|
|
Post by The Mad Modeller on Mar 20, 2010 17:30:48 GMT -5
That looks great Gary.
|
|
|
|
Post by Gary Kulchock on Mar 21, 2010 22:43:44 GMT -5
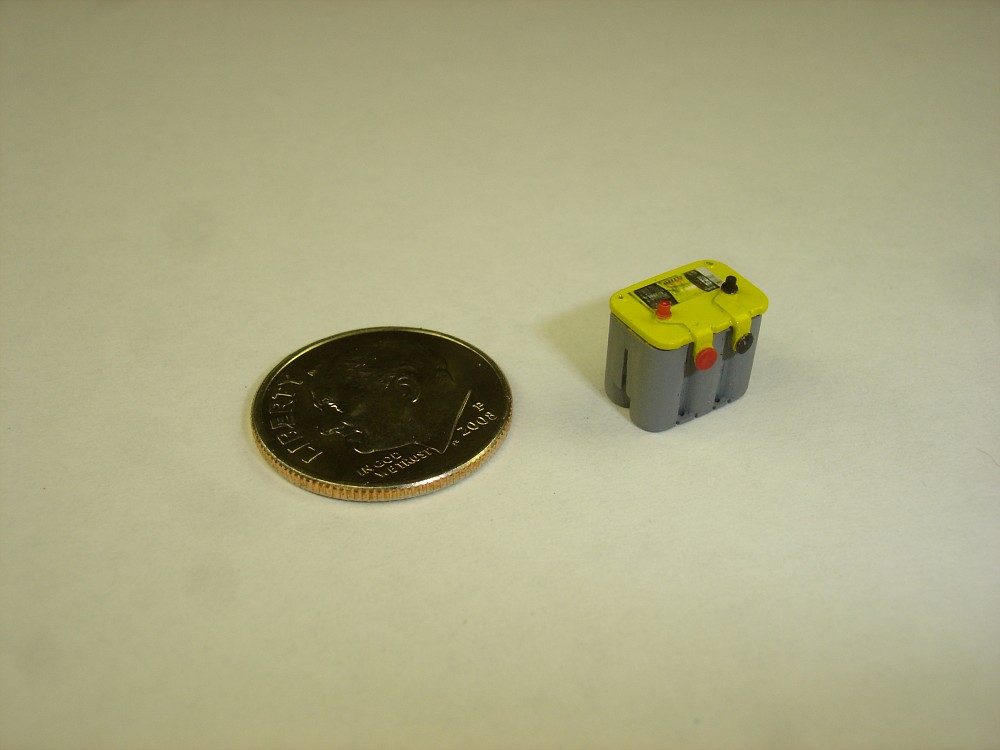
It's all in the details! Here is my scratch-built Optima battery.  I also got some detail painted on the body. Here's the belly of the beast.  |
|
|
|
Post by fireguy14 on Mar 21, 2010 23:02:23 GMT -5
Just awesome Gary!
|
|
|
|
Post by Nacho Z on Mar 22, 2010 4:28:09 GMT -5
On the belly....is that the old onion / orange bag trick or is it from that pair of fish net stockings you wore during the 24 hour build?!?!  ;D |
|
|
|
Post by Gary Kulchock on Mar 22, 2010 5:37:15 GMT -5
 Actually there your girl friends stockings and I have enough left over to do the entire underside of my 1:1 4Runner. ;D Michael's sells aluminum screen in 2 different sizes. This is the larger 1/4" x 1/8" size. Nice part about this stuff is it retains it's shape so you can mold it any way you like.
|
|
|
|
Post by Nacho Z on Mar 22, 2010 10:49:50 GMT -5
 Actually there your girl friends stockings and I have enough left over to do the entire underside of my 1:1 4Runner. ;D LOLOLOLOLOLOL!!!! |
|
|
|
Post by coopdad on Mar 22, 2010 11:09:09 GMT -5
Wow, the blue is a real surprise. I guess in my mind I thought it would be yellow since it was that way for so long. Great job!
What is the stuff you used as heat shield?
John
|
|
|
|
Post by Gary Kulchock on Mar 22, 2010 11:55:42 GMT -5
Wow, the blue is a real surprise. I guess in my mind I thought it would be yellow since it was that way for so long. Great job! What is the stuff you used as heat shield? John Made by Model Factory Hiro. www.hlj.com/product/MFHP928If you want something a little finer in detail, but you will need to add your own glue, try the inside wrapper in a cigerette pack as I did on my Bug. (Look close!)  |
|
|
|
Post by coopdad on Mar 22, 2010 18:07:22 GMT -5
Ah man, too bad I don't smoke!  Seriously, that cig foil looks to be exactly what I need. Thanks. John |
|
|
|
Post by Gary Kulchock on Mar 22, 2010 20:39:36 GMT -5
Ah man, too bad I don't smoke!  Seriously, that cig foil looks to be exactly what I need. Thanks. John Neither do I and that's a good thing. My wife works with a couple people that do. |
|
|
|
Post by wtsf150 on Mar 22, 2010 21:08:20 GMT -5
John keep an eye on your mail i know several at work that smoke if you need some i'll send you some and GREAT tip Gary BTW the Predator is looking awesome
Willie
Shot ma a PM John if you do want some of that cig foil
|
|
|
|
Post by Eddie on Mar 23, 2010 3:47:14 GMT -5
Amazing work Gary. Do you have any pic's of the original kit so we can truly appreciate the amount of modifications you've made?
|
|
|
|
Post by Gary Kulchock on Mar 23, 2010 6:28:35 GMT -5
Amazing work Gary. Do you have any pic's of the original kit so we can truly appreciate the amount of modifications you've made? Well here's the original kit. The interior and doors were cut out rearward about 3/8". The cheap plastic suspension on the kit was not used. Only the 2 body halfs were used.  .... and here's the start of the fenders. 2 kits were used as it took both fenders from 1 kit to do each side.  The hood scoop is from the 'Cristine" pro-stock car. and the running boards are scratch-built. The headlights are 1/48 scale bombs from a military kit I had laying around. The full width tail light is a 1:1 trailer clearance light housed in scratch-built bodywork. |
|
|
|
Post by Gary Kulchock on Mar 27, 2010 23:05:50 GMT -5
;D It's been a great Saturday. 12 hours on the Predator today! Got the massive rear wheels machined and the centers painted.   The body parts get cleared tomorrow.  95% of the parts have been painted.  2 1/2 weeks till the NNL and assembly gets started tomorrow. I hope I make it. Later ...... ;D |
|
|
|
Post by Nacho Z on Mar 28, 2010 10:50:09 GMT -5
Looking great Gary!!
|
|
|
|
Post by Gary Kulchock on Mar 28, 2010 11:50:27 GMT -5
;D The clear has been layed down and it looks fantastic. I'll give it till Thursday or Friday before polishing it out.  |
|


